On average, how much time per day do you spend looking at a screen?
Whether it’s checking your phone for Facebook notifications, working on a laptop, or watching Netflix on your tablet, you likely spend a great deal of your day looking down at some sort of technical device.
Thus, the dreaded tech neck occurs. As people continue to spend more and more time looking at devices, neck pain in our society has exponentially increased as a result. Read on for a photo tutorial of yoga poses to help relieve neck pain.
Tech Neck? Here are 8 Yoga Poses for Neck and Shoulder Tension (Video):
What Exactly Is Causing Your Neck Pain?
When you glance down at your device, your weight follows the line of your gaze. Your head angles forward, putting strain on the upper back and causing your shoulders and thoracic spine to round forward to compensate.
This, in turn, displaces extra weight to your hips, which are then forced to compensate by lessening the curvature of your lower back. As one small movement leads to another, your entire body is found in misalignment and, inevitably, pain ensues.
According to a recent study, in a neutral position, an adult head weighs roughly 10-12 pounds.
Yet when compiled with the force of gravity, if the head is moved out of neutral alignment and tilted forward by just 15 degrees, its weight skyrockets to 27 pounds. At 30 degrees, it weighs in at 40 pounds, 49 pounds at 45 degrees and an astonishing 60 pounds at a 60-degree tilt.
Combat Tech Neck – Here’s How!
Obviously, the more the head weighs, the more strain it causes in the surrounding muscles and the body as a whole. The best way to counter the effects of tech neck is to minimize them in the first place. Try your best to hold your devices at head-level and keep your spine in a neutral position when looking at any screens.
But, when you’re already feeling the pain of poor posture in your body, luckily yoga can help!
7 Yoga Poses to Relieve Neck Pain:
The following seven yoga poses and yoga-inspired positions are helpful to stretch and strengthen the muscles in and around the neck that tend to be either contracted or elongated when we move our necks out of neutral alignment.
Try to practice each pose with mindfulness and only move within your own limits. Consistency and patience are key factors to reducing the pain from tech neck, so take it slow.
Practice these 7 yoga poses to relieve tech neck pain:
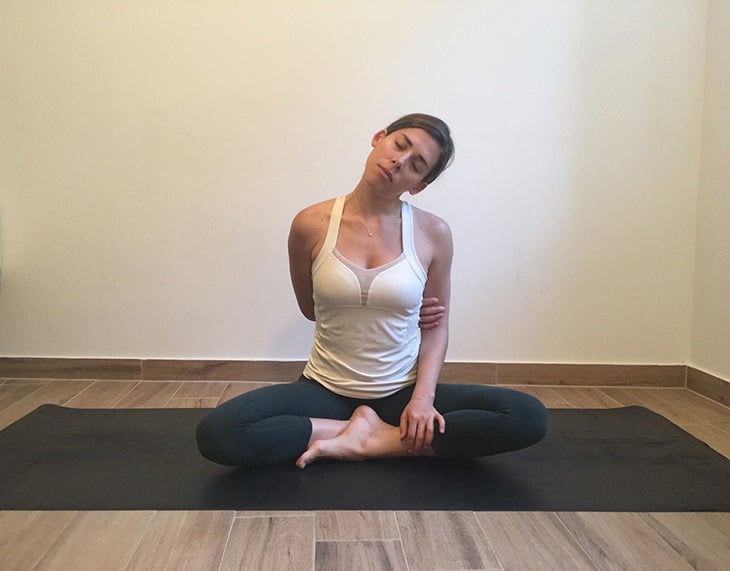
1. Neck Stretch
When someone experiences tech neck, the muscles of the neck are obviously strained. Simply working to stretch and lengthen these overworked muscles can help alleviate some of the pain.
Here’s how to do it:
Start seated in any comfortable position (you can sit in a chair or on the floor). Try to align the crown of your head over your shoulders and your shoulders over your hips. Find length throughout your entire back body by sitting up nice and tall.
Maintaining this posture, reach your right arm behind your back and take a hold of your left bicep (if this feels out of reach for you, you can wrap a yoga strap or a towel around your left bicep and then hold onto that with your right hand). Allow your left arm to rest in your lap and relax your shoulders down away from your ears.
Inhale to reach the crown of your head toward the sky, and exhale to gently release your left ear toward your left shoulder. Soften your shoulders and your jaw as you lengthen through the entire right side of your neck. You can experiment with turning your gaze (and chin) down or up to find the angle of the stretch that best serves you.
Hold for 5-10 deep breaths and then repeat on the opposite side, switching your arms and the tilt of your head.
Looking for more yoga tutorials and yoga tips? Check out our full library of Yoga articles here
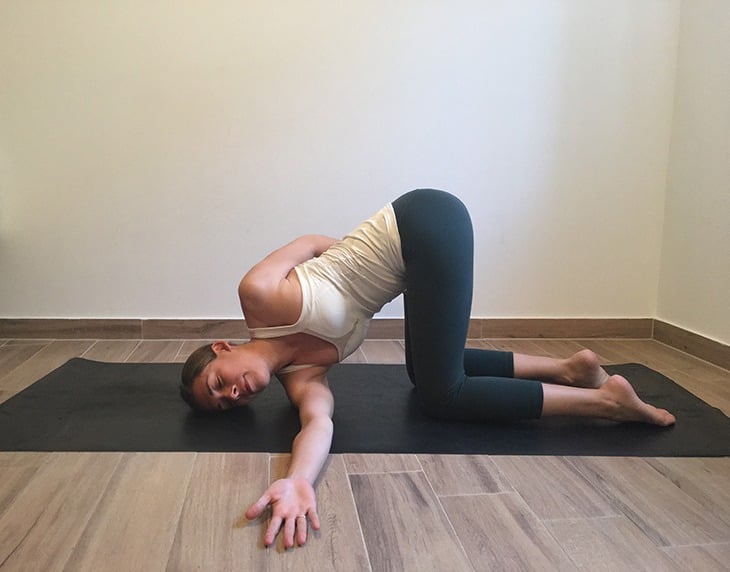
2. Shoulder Thread-the-Needle
The shoulders pick up a lot of the slack left over from the neck, and because tech neck can misalign the body so severely, shoulder stretches are also essential to eliminate neck pain.
Here’s how to do it:
Start on all fours in a tabletop position with your shoulders aligned over your wrists and your hips aligned over your knees. As you inhale, reach your right arm up toward the sky and open your chest toward the right.
As you exhale, reach your right arm underneath your left shoulder, “threading the needle” as you lower your right shoulder and right cheek to either the floor, a block, a bolster or a blanket.
You can stay as you are, or if you’d like to deepen the release, you can wrap your left arm around your lower back (perhaps even hooking your fingers into your hip crease) to twist your chest open further toward the left. Hold for about 5-10 deep breaths before repeating on the other side.
3. Supported Fish Pose
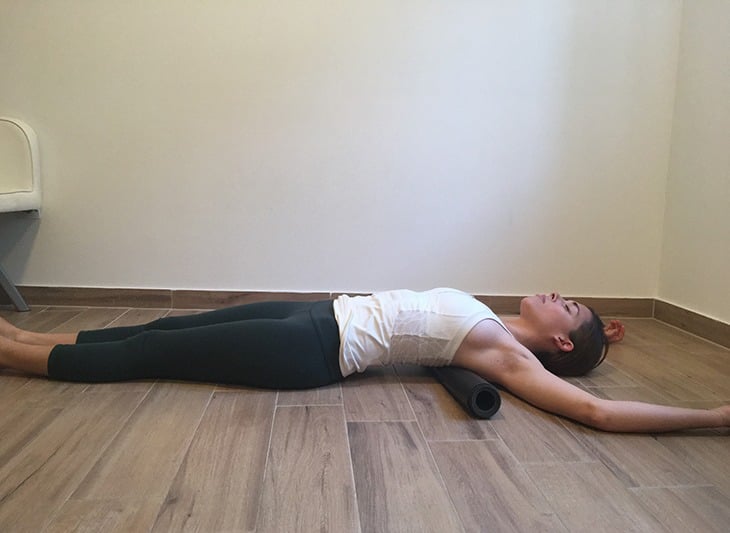
This position is excellent to counteract the posture that most people hold all day – hunched over a computer, looking down – which leads to tech neck. Opening the chest and shoulders and moving the neck in the opposite direction can work wonders to improve the symptoms of tech neck.
Here’s how to do it:
Recline over either a block, a rolled up yoga mat, a pillow, a rolled up blanket, a stack of books, or a yoga wheel. Place whichever object you’re using directly underneath your thoracic spine (the bottom of the object should touch the bottom tip of your shoulder blades) so that your chest expands upward toward the sky in a supported backbend.
You can allow your arms to release toward your hips, you can open your arms out wide into a T-shape, or you can reach your arms up over your head (each option will stretch a different part of your pectoral muscles, so choose whichever feels best or even work all three!).
Relax your weight completely into the object you are reclined over and surrender muscular control. Hold for about 3-5 minutes, maintaining deep breathing.
4. Dolphin Pose
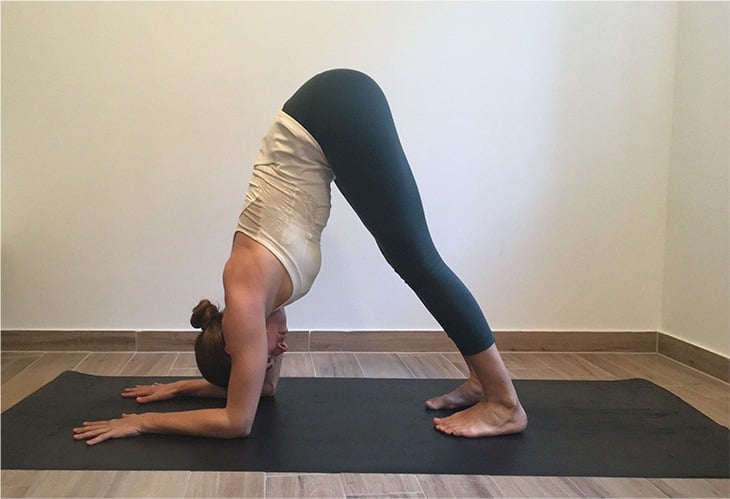
While stretching is important to combat tech neck, strengthening exercises are also crucial. Dolphin works to both stretch and strengthen the muscles surrounding the neck to create a stable base for your (heavy!) head to rest on in healthy alignment.
Here’s how to do it:
Again, start on all fours in a tabletop position. Bring your forearms to the floor and grab hold of opposite elbows to ensure that your arms are shoulder-width apart.
Maintain that distance as you place your forearms parallel to each other on the mat. Spread your fingers wide and press down firmly into your forearms to lift your chest up and away from the floor.
From here, tuck your toes and lift your knees off the mat and start to walk your feet toward a Downward Facing Dog shape while leaving your forearms on the floor. Try to walk your feet as close toward your hands as possible (feel free to bend your knees here).
Keep pressing your forearms into the floor and expand your chest toward your thighs. Relax the weight of your head and let it hang heavy with gravity. Hold for 5- 10 full, deep breaths.
5. Forward Fold with Neck Stretch
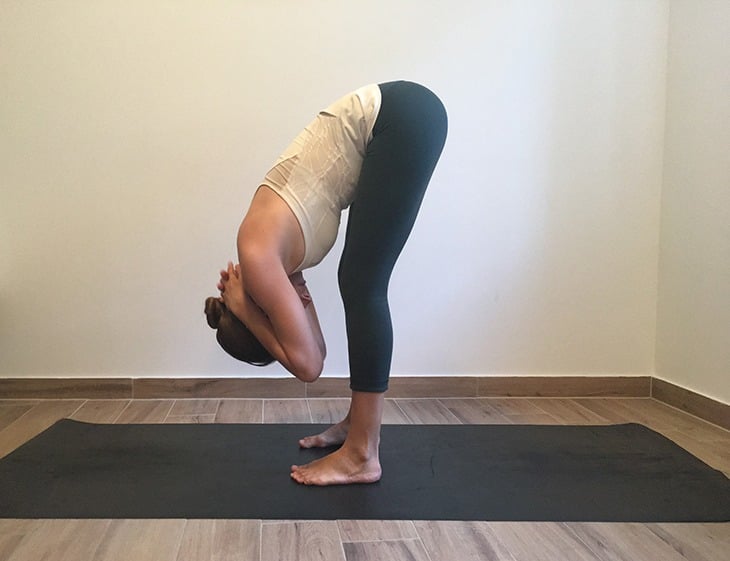
Allowing gravity to help pull the weight of your head and torso down toward the floor can help to lengthen the cervical spine and release any built-up tension in the neck and shoulders.
Here’s how to do it:
Place your feet about hip-distance apart and hinge forward from the hips into a standing forward fold, or classic Uttanasana. Feel free to bend your knees as much as you would like to. Relax the weight of your head and torso and let everything surrender downward with gravity.
Interlace your fingers behind your neck and soften the weight of your arms toward the floor. Be cautious not to push or pull on your neck here – instead, simply allow the added weight of your arms to move you further into your release. Hold for about one minute.
6. Forward Fold with Chest & Shoulder Stretch
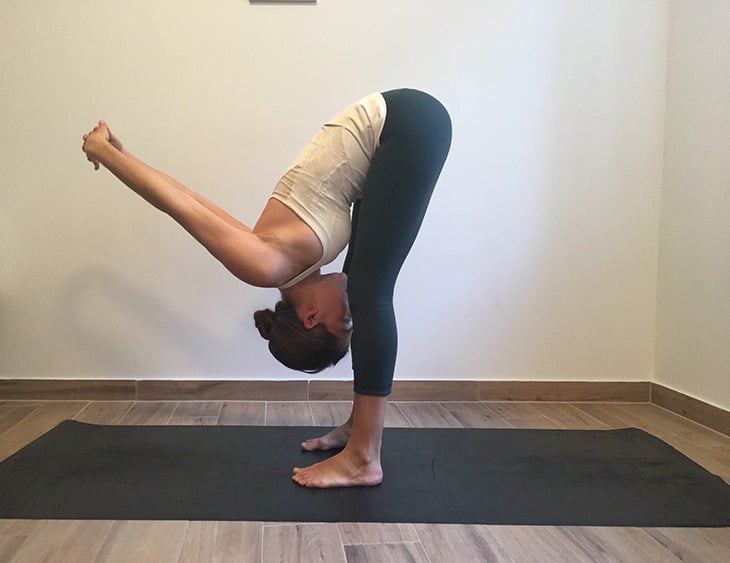
As noted in the previous pose, using your own body weight in conjunction with the force of gravity can move you deeper into stretches. This stretch works to release the shoulders and chest (which are both highly contracted as a result of tech neck).
Here’s how to do it:
Start in the previous forward fold, but this time, interlace your fingers behind your back and work toward straightening your arms as much as possible over your head. Reach your arms first straight up and then allow them to surrender with gravity towards the front of your mat.
Draw your shoulder blades toward each other and broaden your chest. Allow your torso and your head to be heavy and relaxed. Hold for about one minute.
7. Wall Chest & Shoulder Opener
As previously mentioned, releasing strain and tightness from the chest and shoulders is critical to relieving the pain and tension caused by tech neck. Our bodies are one interconnected web and releasing tension from one area can help to alleviate it from another as well.

Here’s how to do it:
Find a neutral stance facing a wall and stand one foot away from it. Stand up tall and stack your shoulders directly above your hips. Heel-toe your feet hip-distance apart and place a micro-bend into your knees. Gently activate your core to support your spine.
Place your right hand on the wall in line with your shoulder and point your fingers toward the right. Maintaining your neutral spine, slowly begin to turn your torso away from the wall and walk your feet toward the left as far as it feels comfortable. Breath into the release through your chest and shoulders for about 5-10 deep breaths before repeating on the opposite side.
Undo the Negative Affects of the Desk With This Class
Yoga Class
With Ashton August
Neck Pain Be Gone! These Yoga Poses Will Help
Practicing these yoga poses to relieve neck pain will help you find some relief from tech neck. Remember – the poses and stretches themselves are just as important as restructuring your posture when you use technical devices.
The best way to relieve the pain from tech neck is to simply prevent it, but along the way, yoga can certainly help!


